2026 Collector’s Handbook: Scale Model Maintenance & Repair

Advertisements
The 2026 Collector’s Handbook to Scale Model Maintenance and Repair provides comprehensive, up-to-date strategies and techniques for preserving and restoring valuable scale models, ensuring their longevity and aesthetic appeal for enthusiasts and collectors.
Welcome, fellow enthusiasts, to the definitive guide for safeguarding your cherished miniature masterpieces. If you’re a dedicated collector, you understand that the passion extends far beyond acquisition; it encompasses the meticulous care and occasional restoration of these delicate works of art. This 2026 Collector’s Handbook to Scale Model Maintenance and Repair is your essential companion, designed to equip you with the knowledge and techniques needed to ensure your collection remains in pristine condition for years to come.
Advertisements
Understanding the Importance of Regular Maintenance
Regular maintenance is not merely a chore; it is a fundamental aspect of responsible scale model ownership. Neglecting proper care can lead to irreversible damage, fading, and a significant decrease in your model’s value and aesthetic appeal. In 2026, with advancements in materials and environmental challenges, understanding proactive maintenance is more crucial than ever.
Preventative measures form the cornerstone of any effective maintenance routine. By anticipating potential issues and addressing them before they escalate, collectors can avoid costly and complex repairs down the line. This approach not only preserves the physical integrity of your models but also maintains their historical and sentimental value.
Environmental Control: Your First Line of Defense
The environment in which your models are displayed and stored plays a pivotal role in their long-term preservation. Fluctuations in temperature and humidity, along with exposure to direct sunlight and dust, are among the most significant threats to any collection.
- Temperature Stability: Aim for a consistent room temperature, ideally between 68-72°F (20-22°C), to prevent material expansion and contraction that can lead to cracks or warping.
- Humidity Management: Maintain relative humidity between 40-60%. High humidity can promote mold growth and corrosion, while low humidity can cause materials to become brittle. Dehumidifiers or humidifiers might be necessary.
- UV Protection: Direct sunlight contains harmful UV rays that can fade paint, decals, and plastic components. Display models away from windows or use UV-protective glass for display cases.
Implementing these environmental controls creates a stable microclimate for your collection, significantly reducing the rate of degradation. It’s a small investment that yields substantial returns in model longevity.
Essential Tools and Supplies for the Modern Collector
Just as a surgeon relies on precision instruments, so too must the scale model collector. The right tools and supplies are indispensable for effective maintenance and repair. In 2026, the market offers a sophisticated array of products tailored specifically for model enthusiasts.
Investing in quality tools not only makes tasks easier but also minimizes the risk of accidental damage during handling. It’s important to distinguish between general household tools and those specifically designed for the delicate nature of scale models.
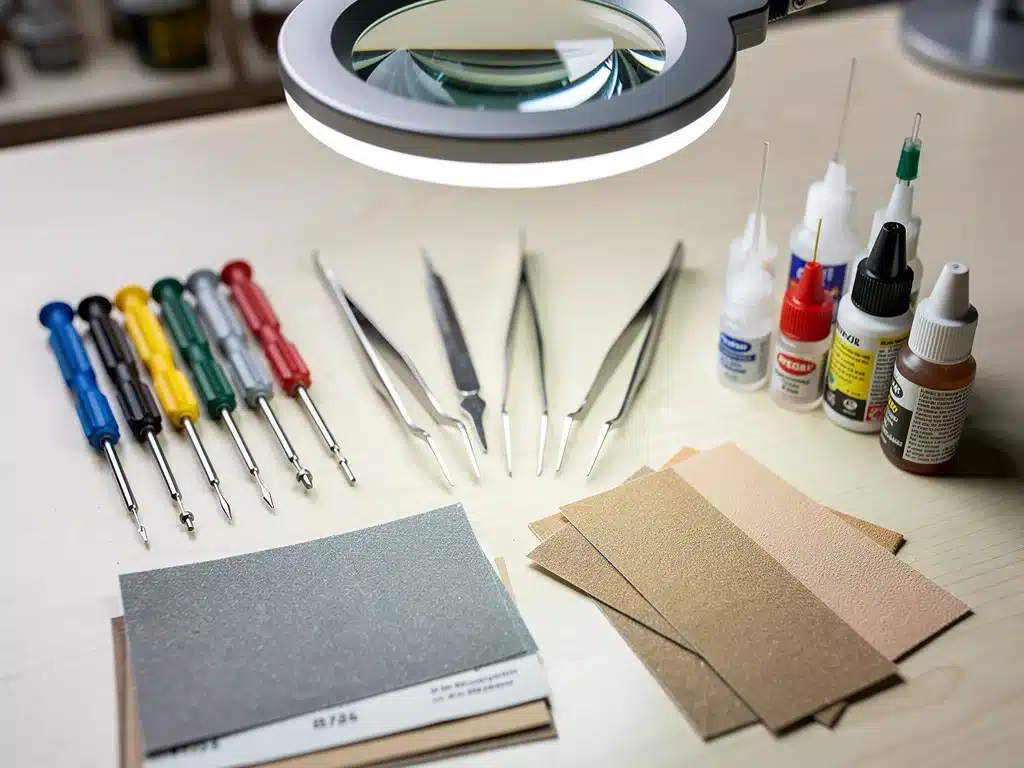
For cleaning, soft brushes and microfiber cloths are paramount. These prevent scratching delicate surfaces while effectively removing dust. For more intricate cleaning, specialized air blowers or canned air can dislodge particles from hard-to-reach areas without direct contact.
Adhesives and Fillers: Choosing Wisely
When repairs become necessary, the choice of adhesive and filler is critical. Using the wrong type can cause discoloration, damage the material, or result in a weak bond.
- Plastic Cement: Ideal for plastic models, it chemically bonds parts by slightly melting the plastic, creating a strong, seamless joint.
- CA Glue (Cyanoacrylate): Commonly known as super glue, it offers a fast and strong bond for a variety of materials, but care must be taken with application to avoid frosting.
- Epoxy Adhesives: Provide extremely strong bonds for heavier parts or mixed materials, offering a longer working time for precise positioning.
- Putties and Fillers: Used to fill gaps, smooth imperfections, and reconstruct missing parts. Acrylic and epoxy putties are popular for their workability and sandability.
Always test adhesives and fillers on an inconspicuous area or scrap material before applying them to your valuable models. This prevents unforeseen reactions and ensures compatibility.
Advanced Cleaning Techniques for Different Materials
Different scale model materials require distinct cleaning approaches. What works for a die-cast car may be detrimental to a resin figure or a plastic aircraft. Understanding these nuances is vital for preserving the integrity and finish of your collection.
The goal of advanced cleaning is not just to remove visible dirt but to restore the original luster and prevent long-term damage caused by environmental pollutants. This often involves a multi-step process, moving from gentle dusting to more intensive restoration methods.
Cleaning Die-Cast Models
Die-cast models, typically made of zinc alloy, are relatively robust but susceptible to dust accumulation, fingerprints, and sometimes even oxidation. Regular, gentle cleaning is key.
- Dust Removal: Use a very soft, lint-free brush or a microfiber cloth to gently wipe away dust. For intricate areas, a soft artist’s brush or canned air (used sparingly and from a distance) can be effective.
- Fingerprint and Smudge Removal: A slightly damp microfiber cloth with a tiny drop of mild, pH-neutral soap (like dish soap diluted in water) can be used. Wipe gently, then immediately follow with a dry cloth to prevent water spots.
- Polishing: For older die-cast models that have lost their shine, a specialized automotive wax or polish designed for clear coats can be applied very sparingly with a soft cloth, then buffed to a gentle sheen. Avoid abrasive polishes.
Always handle die-cast models by their base or tires to avoid leaving new fingerprints on painted surfaces.
Repairing Common Damage: A Step-by-Step Guide
Even with the most diligent care, accidents happen. Parts can break, paint can chip, or decals can peel. This section guides you through common repair scenarios, providing practical, step-by-step instructions to restore your models.
Successful repair requires patience, precision, and the right techniques. Rushing a repair often leads to further damage or an unsatisfactory result. Always work in a well-lit area with a clean, stable surface.

Reattaching Broken Plastic Parts
Broken plastic components are among the most frequent repair needs. Whether it’s a wing, a mirror, or a delicate antenna, the approach is similar.
- Clean the Break: Ensure both broken surfaces are clean and free of old glue, paint, or debris. Use a fine-grit sanding stick or hobby knife if necessary to create a clean mating surface.
- Test Fit: Dry-fit the broken pieces to ensure they align perfectly. If not, gently adjust or sand until they do.
- Apply Adhesive: Apply a small amount of plastic cement or CA glue to one of the broken surfaces. Use a fine applicator for precision.
- Join and Hold: Press the pieces together firmly and hold them in place until the adhesive sets. For plastic cement, this might take a few seconds; for CA glue, it’s almost instantaneous. For larger parts, consider clamping lightly.
- Cure Time: Allow ample time for the adhesive to fully cure before handling the repaired part.
For small, delicate parts, a magnifying lamp and precision tweezers are invaluable tools.
Paint Restoration and Decal Application
Over time, paint can chip, scratch, or fade, and decals can yellow or peel. Restoring these visual elements is crucial for maintaining a model’s aesthetic appeal and accuracy. This often requires a delicate touch and an understanding of appropriate materials.
Before embarking on paint restoration, it’s essential to identify the original paint type and finish. This ensures compatibility with new paints and primers, preventing adverse reactions or an inconsistent appearance.
Matching and Applying New Paint
Color matching is an art. If an exact match cannot be found, it’s often better to repaint an entire panel or section rather than attempting to blend a mismatched patch.
- Surface Preparation: Gently clean and lightly sand the area to be painted. If the chip is deep, use a small amount of filler to smooth the surface, then prime.
- Paint Application: Use hobby-grade acrylic or enamel paints, applied with a fine brush or airbrush, depending on the area size and desired finish. Apply thin coats, allowing each to dry thoroughly before the next.
- Clear Coat: Once the paint is dry, apply a clear coat (gloss or matte, to match the original finish) to protect the new paint and blend it with the surrounding areas.
Practice on scrap material before applying paint to your model, especially for airbrushing, to perfect your technique and achieve an even coat.
Long-Term Preservation and Display Strategies
The ultimate goal for any collector is the long-term preservation of their models. This extends beyond cleaning and repair to encompass thoughtful display and storage strategies that protect against environmental damage and accidental harm. Proper display enhances visibility while simultaneously safeguarding your investment.
A well-planned display not only showcases your collection beautifully but also acts as a passive protective measure. It minimizes direct handling and isolates models from common household hazards.
Display Cases and Shelving
Display cases are paramount for protection. They shield models from dust, curious hands, and even pets. Look for cases with tight seals and, if possible, UV-protective glass.
- Dust-Proofing: Ensure your display cases are as airtight as possible. Even small gaps can allow dust to accumulate over time.
- Lighting: Use LED lighting within display cases, as LEDs emit minimal heat and no UV radiation, unlike incandescent or fluorescent bulbs. Position lights to highlight details without creating hot spots.
- Stable Shelving: Ensure shelves are sturdy and securely mounted. Vibrations or instability can cause models to fall, leading to significant damage.
Consider custom-built display solutions for particularly valuable or unique models, incorporating features like climate control or enhanced security.
| Key Aspect | Description |
|---|---|
| Environmental Control | Maintain stable temperature (68-72°F) and humidity (40-60%) to prevent material degradation. |
| Specialized Tools | Utilize precision brushes, adhesives, and fillers designed specifically for delicate model work. |
| Material-Specific Cleaning | Adapt cleaning methods based on material (die-cast, plastic, resin) to avoid damage. |
| Protective Display | Employ dust-proof, UV-protected display cases and stable shelving for long-term safety. |
Frequently Asked Questions About Scale Model Care
It depends on the display environment. For models in open displays, a light dusting every week or two is recommended. Models in sealed cases may only need cleaning every few months. Always prioritize gentle handling and soft tools to prevent scratches.
For plastic models, a very small amount of plastic cement can sometimes reactivate and soften old glue, allowing it to be gently scraped away. For other materials, specialized glue removers (test on an inconspicuous area first) or careful mechanical removal with a hobby knife might be necessary.
Generally, it’s best to avoid household cleaning products. Many contain harsh chemicals, abrasives, or solvents that can damage paint, plastics, or decals. Stick to mild, pH-neutral soaps diluted in water, or specialized model cleaning solutions, and always test first.
Decal yellowing is often due to UV exposure. Displaying models away from direct sunlight or in UV-protected cases helps significantly. Applying a clear coat over decals after they have fully dried can also seal and protect them from environmental degradation and peeling.
For severely damaged or highly valuable rare models, consider consulting a professional model restorer. They possess specialized skills, tools, and materials to handle complex repairs without further compromising the model’s integrity or value, which is often a worthwhile investment.
Conclusion
The journey of a scale model collector is one of passion, dedication, and meticulous care. As we’ve explored in this 2026 Collector’s Handbook to Scale Model Maintenance and Repair, ensuring the longevity and pristine condition of your collection is an ongoing commitment. From understanding environmental controls and utilizing the right tools to mastering advanced cleaning techniques and executing precise repairs, each step contributes to preserving the beauty and value of your miniature treasures. By embracing these practices, you not only protect your investment but also honor the artistry and craftsmanship inherent in every scale model, guaranteeing that future generations can appreciate these incredible pieces for years to come.


